I can't believe that August is here already! What have I done this summer craft wise? Nothing! Absolutely nothing! Well, not entirely true. I have been able to keep up with my card swap group, thank goodness.
Other than that, I have been very busy with the kids, summer stuff, work and now gearing up for back to school. I am trying for a full time job and keeping my fingers crossed as it is at a local craft store and I would just love to have this job.
I owe a friend a scrapbook and it needs to be done in two weeks. I have to get it done before I start this new job (should it be offered to me - positive thinking, positive thinking) otherwise I will never get to it.
My daughter, who is 12 has decided she would like to take up cake making, decorating etc. She told me the other day that I can have her scrapbooking stuff or just get rid of it. It broke my heart. I will just have to store it away until she comes back to the craft.
Other than that, I have been watching alot of videos on cardmaking, cricut, scrapbooking and so forth. I have to stay motivated somehow right?
Sunday, August 1, 2010

Monday, May 3, 2010
NSD MPS Challenge #9 - Take Shape

I made this gator card for the NSD MPS (www.mypinkstamper) challenge #9. I used the Create A Critter cartridge and my Gypsy to create the card base then added the various layers and some accents. I love how cute this turned out.
NSD MPS Challenge #1 - Mother Dear, I love you so...
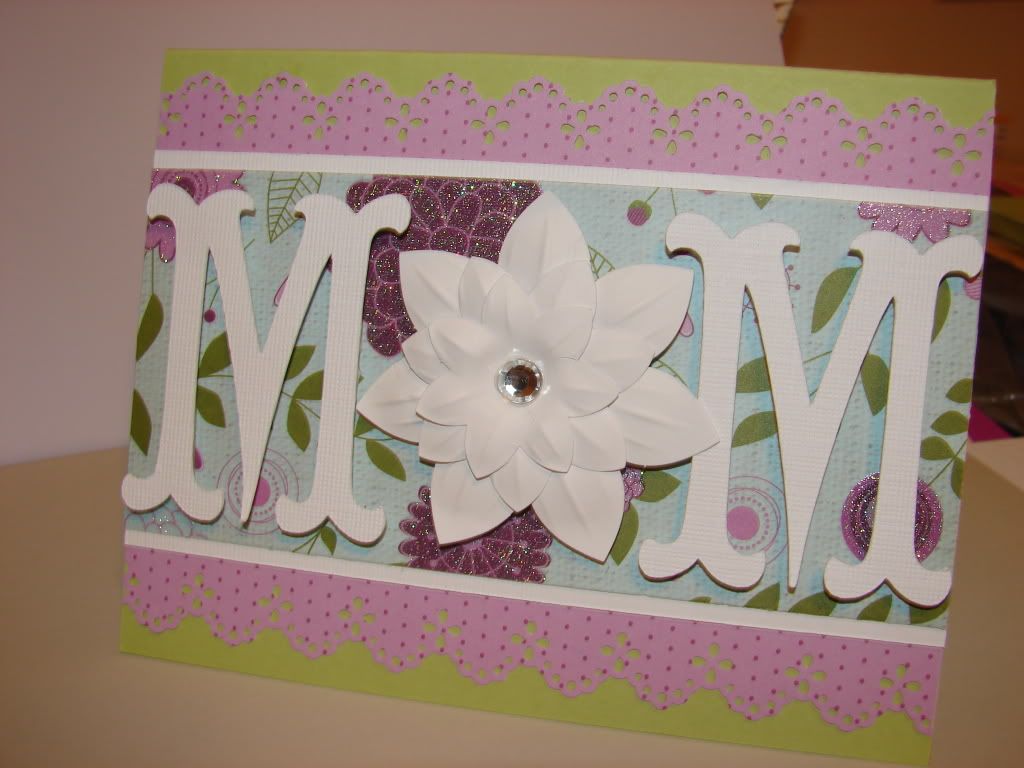
I am trying to participate in a couple National Scrapbook Day challenges with Robyn over at www.mypinkstamper.com. This is my submission for challenge #1.
Saturday, April 10, 2010
MPS Challenge - Pink, Green and Black
.jpg)
.jpg)
.jpg)
I decided to give the MPS challenge a go before heading off to work today. I opted to "go green" and use nothing but paper scraps to create this card. I used the Paper Pups Cricut cartridge and and EK Success border punch. The ribbon is Hobby Lobby ribbonFX brand.
If you'd like to try this challenge, just visit www.mypinkstamper.com for the details.
Thursday, April 8, 2010
Thank you card
.jpg)
I've gotten a jump start on my May card swap cards. The month's them is Thank you cards. I made this card using Hobby Lobby paper studio card stock and Hobby Lobby ribbon. I also used an embossing scallop paper punch by EK success for the solid pink cardstock.
Wednesday, April 7, 2010
April Card Swap - use glitter
.jpg)
.jpg)
We have to use glitter in our cards this month. I chose a spring/butterfly birthday theme for my card and added glitter to the wings of the butterfly. The butterfly cardstock is also glittered and is from the Blossoms and Butterlfies DCWV stack. I used Studio G pigment ink and the dots of the butterfly path were made with a creative memories fine tip marker. The butterfly is from Cricut Paper Pups cartridge.
Inside: Happy Birthday
Tuesday, March 30, 2010
Ta-da!!!! Finally, I am getting around to posting a recent project
.jpg)
.jpg)
I made this card for my monthly card swap for the month of March. We had to make a card with some type of pop up. I chose to make a sunny card to chase the winter blahs away. I really like how this card turned out. I used the cricut with Stretch your Imagination and Lifes a Beach cartridges.
Monday, March 22, 2010
Another month gone
OMgoodness, I just had to laugh when I read my last post. I did complete some cards since I made that last post, I just have not posted them. I submitted an entry for MyPinkStamper's design team and am waiting to hear from them before I post my card.
I found a new group to scrap and make cards with. Some mom's from my son's school get together every Tuesday, all day and do nothing but scrap and make cards. They invited me to join them and I did for the first time last week. I had so much fun. Since working, I have not been able to get to my usual crops and have really felt lost. I love my craft, but like it even more when I am together with a group. Tuesday's are now going to be my "play dates".
Now hopefully I really will be able to get some new cards posted. I've no reason not to.
I found a new group to scrap and make cards with. Some mom's from my son's school get together every Tuesday, all day and do nothing but scrap and make cards. They invited me to join them and I did for the first time last week. I had so much fun. Since working, I have not been able to get to my usual crops and have really felt lost. I love my craft, but like it even more when I am together with a group. Tuesday's are now going to be my "play dates".
Now hopefully I really will be able to get some new cards posted. I've no reason not to.
Monday, February 15, 2010
Once again, it has been forever.
I can't believe how long it has been since I last posted. November 2, 2009 I believe. I started a new part time job in November and all my "free time" dissappeared. I am now working at Michaels and it is a fantastic job. What better place for a crafter to work than at a craft store.
I am finally trying to get things organized now that time is once again being a bit generous to me. I should, over the next day or so be able to post pictures of items I created over the past few weeks. Once I do that, I hope to be able to get the ball called momentum rolling and be able to keep up my blog. Wish me luck!
I am finally trying to get things organized now that time is once again being a bit generous to me. I should, over the next day or so be able to post pictures of items I created over the past few weeks. Once I do that, I hope to be able to get the ball called momentum rolling and be able to keep up my blog. Wish me luck!
Monday, November 2, 2009
Holiday crafting
I've been busy getting ready for a craft show I am participating in later this month. This is a Poinsetta gift card holder I created. The flowers were made with the Joys of the Season cricut cartridge. The large flowers are cut at 4 1/4 inches and the smaller flowers at 2 1/2 inches. I did two top layers for each and when I placed the layers together, I used pop-dots. Also I used glimmer mist on the top layer for some added shimmer. The bucket is from the dollar bin at Target.


.jpg)
.jpg)
.jpg)
Tuesday, October 13, 2009
I'm hosting a Scentsy wickless candle party
I am hosting my first Scentsy party on October 24th. If you would like more information or would like to order through my party, please visit http://www.trulywickless.com/ and you can place an order through my party listed under Alice Zimmer.
Monday, September 7, 2009
September Card Swap
Our theme for the month of September is Halloween. I could not wait to do this month's swap as anything to do with Fall or Fall holidays are my favorite themes to create cards and scrapbook pages. I used two Northwood stamps for this card the witch hat (M7002) and the inside saying (H7081). The green cardstock is from Stampin Up in Kiwi Kiss.
The card measures 4 1/4 by 11 inches, it is scored at 5 1/2 and then I take the front flap and fold it back in half. The green cardstock mats measure 4 by 2 1/2 and 4 by 5 1/4. The purple mat meausres 3 1/4 by 3 3/4 and the glitter mat measures 3 by 3 1/2.


The card measures 4 1/4 by 11 inches, it is scored at 5 1/2 and then I take the front flap and fold it back in half. The green cardstock mats measure 4 by 2 1/2 and 4 by 5 1/4. The purple mat meausres 3 1/4 by 3 3/4 and the glitter mat measures 3 by 3 1/2.
.jpg)
.jpg)
.jpg)
Friday, August 28, 2009
August Cards
These are two cards made from the Lilly at the Beach stamp set (check out all the cute Lilly and Billy stamps at http://www.pinkcatstudio.com/). Both images were colored with Stampin Up water color pencils and blender pens.


.jpg)
.jpg)
Tuesday, August 11, 2009
My stamp convention haul
This is one of my happiest purchases. I wanted a new way to store my Tombow markers and found this holder. I decided to use some S hooks with an Ikea Bygel Rail and basket. It hangs flat against the wall and is just perfect.

This is the upclose of how I used the S hooks.

What the heck, one more shot.

This is the batch of stamps I bought from Northwoods. These people were so nice. I had my 11 year old daugher with me and the gentleman working the booth struck up a conversation wtih her, to encourage her to get her creativity, he had her go pick out any stamp she wanted. She pick out the cutest halloween window stamp. I've been told by her that it is her's and her's alone. lol

If you like these stamps or would like to see what else they have to offer, please visit their site at http://www.northwoodsrubberstamps.com/. If you can't find them at your local stamp/craft store, you can order from them directly.
.jpg)
This is the upclose of how I used the S hooks.
.jpg)
What the heck, one more shot.
.jpg)
This is the batch of stamps I bought from Northwoods. These people were so nice. I had my 11 year old daugher with me and the gentleman working the booth struck up a conversation wtih her, to encourage her to get her creativity, he had her go pick out any stamp she wanted. She pick out the cutest halloween window stamp. I've been told by her that it is her's and her's alone. lol
.jpg)
If you like these stamps or would like to see what else they have to offer, please visit their site at http://www.northwoodsrubberstamps.com/. If you can't find them at your local stamp/craft store, you can order from them directly.
Monday, August 10, 2009
First trip to the Sharonville, Ohio stamp convention
What a wonderful weekend. Who knew there could be so much stuff, in one location, just for rubber stampers (and acrylic too!) I found some great new stamp companies that I'd like to invest in as well as my favorite, Northwoods.
If you have not used a Northwoods stamps, you don't know what you are missing. Their images are beautiful and their sample boards and galleries are top notch. I really like this company as they are the friendliest, most generous people you will ever meet. If you can, take a look at their website at: http://www.northwoodsrubberstamps.com/ . They currently do not have an online store, but that will be up and running in the next month or so, so be sure to check back. I spent most of my convention budget with them and it was so worth it.
A stamp company that I'd not heard of was Inky Antics http://www.inkyantics.com/. They have some really darling, as well as humorous stamps. You can find something for any occasion with Inky Antics.
I also loved the stamp sets from Starving Artistamps http://starvingartistamps.com/index.html
If I had more money budgeted they had a funny Witch Trio stamp set that I loved.
Judikins was another booth that was a must see and a class I was able to attend. Their embossing work is amazing on the sample boards they had and in the classes they taught. I sat in a class taught by Judy Wantanabe and she demoed Mica Glaze, Diamond Glaze, braying techniques, and embossing techniques. Oh what fun I could have if I had all the craft money in the world! Judikins website is http://www.judikins.com/. Judy has some tutorial videos under the projects tab.
This was definitely the place to be to find all the stuff that I see in magazines but never can find at my LCS. I've never seen so many different colors of embossing powders, alcohol inks, micro beads, flock, flower soft etc. I was even lucky enough to pick up my first Copic markers to play with, and I was able to fill in some of my missing Tombow water color markers.
I can't wait until next year!
If you have not used a Northwoods stamps, you don't know what you are missing. Their images are beautiful and their sample boards and galleries are top notch. I really like this company as they are the friendliest, most generous people you will ever meet. If you can, take a look at their website at: http://www.northwoodsrubberstamps.com/ . They currently do not have an online store, but that will be up and running in the next month or so, so be sure to check back. I spent most of my convention budget with them and it was so worth it.
A stamp company that I'd not heard of was Inky Antics http://www.inkyantics.com/. They have some really darling, as well as humorous stamps. You can find something for any occasion with Inky Antics.
I also loved the stamp sets from Starving Artistamps http://starvingartistamps.com/index.html
If I had more money budgeted they had a funny Witch Trio stamp set that I loved.
Judikins was another booth that was a must see and a class I was able to attend. Their embossing work is amazing on the sample boards they had and in the classes they taught. I sat in a class taught by Judy Wantanabe and she demoed Mica Glaze, Diamond Glaze, braying techniques, and embossing techniques. Oh what fun I could have if I had all the craft money in the world! Judikins website is http://www.judikins.com/. Judy has some tutorial videos under the projects tab.
This was definitely the place to be to find all the stuff that I see in magazines but never can find at my LCS. I've never seen so many different colors of embossing powders, alcohol inks, micro beads, flock, flower soft etc. I was even lucky enough to pick up my first Copic markers to play with, and I was able to fill in some of my missing Tombow water color markers.
I can't wait until next year!
Wednesday, August 5, 2009
Crazy wonderful blog candy giveaway!!!!
Malisa from the Cricut Message board is giving away some crazy wonderful blog candy. Go check her blog at http://yabugginme.blogspot.com/. She has really cute projects with great instructions on her site as well, so please check it out.
Tuesday Challenge
Well, Robyn did it! She reached ONE MILLION hits on her blog and is celebrating with challenges and giveaways this week. Please join us at http://www.mypinkstamper.com/ and partake in the challenges and giveaways.
Her first challenge was to use something that you have not used in a long while. I picked one of the very first stamp sets I earned or bought from Stampin Up. The stamp set is Sweet of You. This stamp set led me to purchase water color pencils and blender pens and I have been out of control ever since!

Her first challenge was to use something that you have not used in a long while. I picked one of the very first stamp sets I earned or bought from Stampin Up. The stamp set is Sweet of You. This stamp set led me to purchase water color pencils and blender pens and I have been out of control ever since!
.jpg)
Monday, July 20, 2009
What to you give the guy that has everything for his 40th?
Thank goodness for the idea of a sucker arrangement by a Cricut message board member, CardmkrLeslie, I decided to make one for a friend for his 40th birthday. I used 40 Blowpops in this arrangement. I really like how it turned out.

.jpg)
.jpg)
Friday, July 17, 2009
Wedding Cards
I was speaking to a friend Thursday morning and she asked if I would mind making a wedding card for her as she was going to a wedding Saturday and wanted something special. I designed these two cards for her.
This is the card she picked. I made this with the Flower and Flouish Stamp by Inkadinkado. I also used the Swiss Dots folder for the Cuttlebug. The background paper is Silver Wedding by Masterpiece Studio.

This is the card she picked. I made this with the Flower and Flouish Stamp by Inkadinkado. I also used the Swiss Dots folder for the Cuttlebug. The background paper is Silver Wedding by Masterpiece Studio.
.jpg)
.jpg)
Tuesday, July 14, 2009
Converting wood mounted stamps to cling mount stamps
I am in the process of converting my woodmounted rubber stamps to cling mounted stamps to be used with acrylic blocks. It will save me a ton of storage space. This picture shows how I wast storing my stamps. There are only a few sets left in this cabinet.
 I found this CD/DVD holder at Goodwill. It cost me $12. I am storing the newly converted stamps in CD jewels/cases. I already stored my regular clear acrylic stamps this way. The first two shelves are those acrylic sets.
 This picture is just an example of how much space I am saving on seven Stampin Up wood mounted sets. I converted these and am storing them in six CD cases. You can sort your stamps any way you see fit. I like to store mine in the sets they came with.
 I am going to show you how I converted this stamp set from this:
 To this:
 Please note: I do not guarantee you will have the same results I did in this sample, nor can I be held liable for any mishaps you or your stamps may encounter. You assume all responsibility should you attempt to unmount your stamps. I highly recommend that you watch some how-to videos on Youtube or visit additional blogs or websites on this subject matter.
.jpg) I found this CD/DVD holder at Goodwill. It cost me $12. I am storing the newly converted stamps in CD jewels/cases. I already stored my regular clear acrylic stamps this way. The first two shelves are those acrylic sets.
I found this CD/DVD holder at Goodwill. It cost me $12. I am storing the newly converted stamps in CD jewels/cases. I already stored my regular clear acrylic stamps this way. The first two shelves are those acrylic sets..jpg) This picture is just an example of how much space I am saving on seven Stampin Up wood mounted sets. I converted these and am storing them in six CD cases. You can sort your stamps any way you see fit. I like to store mine in the sets they came with.
This picture is just an example of how much space I am saving on seven Stampin Up wood mounted sets. I converted these and am storing them in six CD cases. You can sort your stamps any way you see fit. I like to store mine in the sets they came with..jpg) I am going to show you how I converted this stamp set from this:
I am going to show you how I converted this stamp set from this:.jpg) To this:
To this:.jpg) Please note: I do not guarantee you will have the same results I did in this sample, nor can I be held liable for any mishaps you or your stamps may encounter. You assume all responsibility should you attempt to unmount your stamps. I highly recommend that you watch some how-to videos on Youtube or visit additional blogs or websites on this subject matter.
Please note: I do not guarantee you will have the same results I did in this sample, nor can I be held liable for any mishaps you or your stamps may encounter. You assume all responsibility should you attempt to unmount your stamps. I highly recommend that you watch some how-to videos on Youtube or visit additional blogs or websites on this subject matter. You will need empty CD cases, if you plan to store your newly unmounted stamps this way. I got mine from Staples. You will need to remove the black insert and discard it.
 I prefer to use the lable that was on the wood stamp. I peel it off the block like this:
 Once it is completely removed, adhere it to a scrap of card stock that you can slide into or tape to the inside front of the CD case.

 Next is the process of removing the rubber from the foam adhesive. Here is my stamp, before the rubber is removed.
 Just work a fingernail or Cricut spatula or painter's spatula between the rubber and the foam mount and begin to peel the rubber. This is typically pretty easy. If you should have a stubborn stamp, you can pop the stamp, rubber side up, into a microwave for about 7 to 10 seconds. This will loosen up the adhesive and make it easier to remove the rubber from the foam.
 If it works properly you should be left with the wood block with the foam adhesive left on it.
 You can also peel the foam adhesive off the block and recycle the blocks to a purpose that suits you.

 Ok, if you should find some of the adhesive stuck to the rubber, just rub it off with your fingers. It should come right off.
 You will need some cling foam adhesive like EZ Mount. Now EZ Mount is very expensive so you may want to search the internet/ebay for less expensive options. Cling foam has a stickly adhesive side and a static cling side which allows you to use the rubber stamps with acrylic blocks.
 Because of the expense, you may want to lay out the rubber stamps before cutting the cling mount to ensure you only use what you need.
 Once you have cut your cling foam, you will adhear the rubber stamps and then trim around each and discard the scraps.
 This is the trimmed, final product. Once trimmed, you can remove the paper backing from the cling side of the cling foam and store the stamp in a CD case.
 Ta-da!!!!

.jpg) I prefer to use the lable that was on the wood stamp. I peel it off the block like this:
I prefer to use the lable that was on the wood stamp. I peel it off the block like this:.jpg) Once it is completely removed, adhere it to a scrap of card stock that you can slide into or tape to the inside front of the CD case.
Once it is completely removed, adhere it to a scrap of card stock that you can slide into or tape to the inside front of the CD case..jpg)
.jpg) Next is the process of removing the rubber from the foam adhesive. Here is my stamp, before the rubber is removed.
Next is the process of removing the rubber from the foam adhesive. Here is my stamp, before the rubber is removed..jpg) Just work a fingernail or Cricut spatula or painter's spatula between the rubber and the foam mount and begin to peel the rubber. This is typically pretty easy. If you should have a stubborn stamp, you can pop the stamp, rubber side up, into a microwave for about 7 to 10 seconds. This will loosen up the adhesive and make it easier to remove the rubber from the foam.
Just work a fingernail or Cricut spatula or painter's spatula between the rubber and the foam mount and begin to peel the rubber. This is typically pretty easy. If you should have a stubborn stamp, you can pop the stamp, rubber side up, into a microwave for about 7 to 10 seconds. This will loosen up the adhesive and make it easier to remove the rubber from the foam..jpg) If it works properly you should be left with the wood block with the foam adhesive left on it.
If it works properly you should be left with the wood block with the foam adhesive left on it..jpg) You can also peel the foam adhesive off the block and recycle the blocks to a purpose that suits you.
You can also peel the foam adhesive off the block and recycle the blocks to a purpose that suits you..jpg)
.jpg) Ok, if you should find some of the adhesive stuck to the rubber, just rub it off with your fingers. It should come right off.
Ok, if you should find some of the adhesive stuck to the rubber, just rub it off with your fingers. It should come right off..jpg) You will need some cling foam adhesive like EZ Mount. Now EZ Mount is very expensive so you may want to search the internet/ebay for less expensive options. Cling foam has a stickly adhesive side and a static cling side which allows you to use the rubber stamps with acrylic blocks.
You will need some cling foam adhesive like EZ Mount. Now EZ Mount is very expensive so you may want to search the internet/ebay for less expensive options. Cling foam has a stickly adhesive side and a static cling side which allows you to use the rubber stamps with acrylic blocks..jpg) Because of the expense, you may want to lay out the rubber stamps before cutting the cling mount to ensure you only use what you need.
Because of the expense, you may want to lay out the rubber stamps before cutting the cling mount to ensure you only use what you need..jpg) Once you have cut your cling foam, you will adhear the rubber stamps and then trim around each and discard the scraps.
Once you have cut your cling foam, you will adhear the rubber stamps and then trim around each and discard the scraps..jpg) This is the trimmed, final product. Once trimmed, you can remove the paper backing from the cling side of the cling foam and store the stamp in a CD case.
This is the trimmed, final product. Once trimmed, you can remove the paper backing from the cling side of the cling foam and store the stamp in a CD case..jpg) Ta-da!!!!
Ta-da!!!!.jpg)
Subscribe to:
Posts (Atom)


.jpg)
.jpg)